|
Step 1
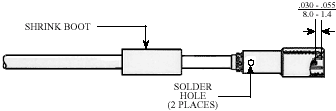
Cut cable to length, clean and square. Strip outer jacket to dimension shown exposing braid Step 2 Cut braid to dimension. Squeeze U-sleeve into position as shown. Turn back braid over U-sleeve as tightly as possible and pot tin dip. Remove all flux. Step 3 Strip inner insulation. No nicked or severed strands allowed. Pot tin dip core and cut to dimension shown. Step 4 Slide on washer. Lubricate the seal with fluorosilicone grease and slide into place. Solder contact in place through holes using SN60 solder in accordance with J-STD-006. Completed solder joint must have a continuous fillet of solder between the inner conductor and the contact. The solder in the feed hole must be free of pinholes and flush or below flush. No gap allowed between end of contact and inner insulation and no solder buildup allowed on the contact outer diameter. Clean thoroughly. Step 5 Shrink tubing in place at 300° to 320°F (150° to 160°C). Allow tubing to cool undisturbed to prevent formation of a cold solder joint. Step 6 Slip shrink boot over cable. Insert assembled cable into body coupling nut assembly until the contact shoulder bottoms out in in the insulator. Solder body to maintain a slight pressure on the cable in the body. Solder through two holes using SN60 solder in accordance with J-STD-006. Clean thoroughly. Step 7 Shrink boot into position as shown at 300° to 320°F (150° to 160°C). |
|
 |
|
 |
|