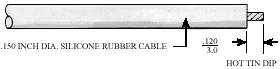
Step 1
Cut cable to length, clean and square. Strip cable to dimension shown. No nicked or severed strands allowed. Hot tin dip as noted and remove all flux.
Step 2
Rosin flux conductor and solder contact to conductor through the feed hole using SN60 soldering accordance with J-STD-006. Completed solder joint must have a continuous fillet of solder between the cable conductor and the contact. Solder in the feedhole must be free of pinholes and flush or below flush. Rear of contact shoulder must be as flush as possible with insulation of cable.
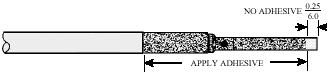
Step 3
Mask the areas where abrading is not indicated with masking tape. Abrade un-masked areas lightly using air blast abrasive sand or new abrasive cloth. Remove mask taking care not to touch the abraded area. Degrease by wiping the internal bore of the connector insulator and abraded areas by dipping or swishing in Isopropyl alcohol. Wipe with lint-free cloth and let dry five minutes. From a clean container, brush a thin film (.001 to .003 inch) of General Electric SS4004 primer over indicated surfaces of the contact. Do not allow primer to drip into contact ends. Let dry at room temperature for a minimum of one (1) hour. Do not touch or contaminate the primed areas.
Step 4
Brush a light film (.010 inch) of General Electric RTV 162 adhesive to primed surfaces of the contact and abraded areas of the silicone rubber cable. Do not allow adhesive to drip into contact end.
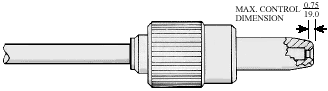
Step 5
Immediately after applying adhesive, insert contact with cable into connector insulator. Rotation of the contact is permitted during insertion. Apply enough pressure to displace residual air at interface. Make sure the contact shoulder butts against the insulator internal flange and that the “control dimension” is maintained. Place bonded cable assembly in a humidity oven with a relative humidity level of at least 60% for 24 hours @ 100°F (38°C). An option is to cure the assembly at room temperature for 48 hours. Do not disturb the assembly during the curing time.
Step 6
Applies to Series 830 plugs only. Slide the metal coupling nut over the body/insulator and install the “C” retaining ring.