Series |
N/A 31 |
Assembly Type |
N/A Shorting Plug Adapter |
Altitude/Reduced Pressure Rating |
N/A Sea Level |
Current Rating |
N/A 10 Amp |
Operating Temperature |
N/A -40 to 85 ºC |
Test Voltage |
N/A TBD |
Polarization |
N/A
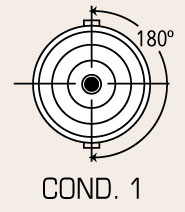 Cond. 1 |
Mating Compatibility |
N/A Mates all Series 311 Cond. 1 receptacles and adaptors. |
Coupling Style |
N/A Bayonet |
Sealed Receptacle |
N/A Yes |
| Standard/Non-Standard1 | N/A Non-standard Part |
Export Classification |
N/A TBD |
RoHS Compliant |
N/A TBD |
Voltage Rating |
N/A 6.5 kVDC |
|
Step 1 Step 3 | |||||||||||


